通过 MQTT 触发
本教程展示如何使用简单的 MQTT 消息远程触发 OV20i 摄像头。只需几个步骤,您就可以在网络中的任意位置捕获和处理图像——无需复杂的编程!
你将构建的内容: 一个简单的远程触发器,允许通过网络发送基础消息来启动摄像头的检测。
预计时间: 20–30 分钟
技能等级: 初级
实际示例: 想象在操作员平板上的按钮可以瞬时触发摄像头对零件进行检测——这和我们要构建的一样,但使用 MQTT 消息而不是按钮。
前提条件
- OV20i 摄像头已连接并正常工作
- 已设置并就绪的配方
- MQTT 通信已配置(如需,请参阅 MQTT Communication Setup 指南)
在 Imaging Setup 将摄像头触发模式设置为 Manual——这会让摄像头等待您的远程命令,而不是自动拍照。
为什么使用 MQTT 触发更简单
OV20i 让远程触发变得简单:
- 无需编程 - 只需拖拽并连接几个节点
- 可立即工作 - 发送一条消息,立刻获得结果
- 消息可靠 - MQTT 确保指令到达摄像头
- 任何设备都可以触发 - 平板、计算机、PLC 或传感器
适用于: 远程检测控制、自动化生产线,或任何需要从另一地点触发摄像头的情形。
第 1 步:快速摄像机检查
1.1 将相机设为 Manual 触发
- 进入您的 Recipe Editor
- 点击“Imaging Setup”
- 查找 Trigger Mode,并将其设为 "Manual"
- 点击 Save
为什么选择 Manual? 这表示摄像头会“等待我的命令”,而不是自动拍照。
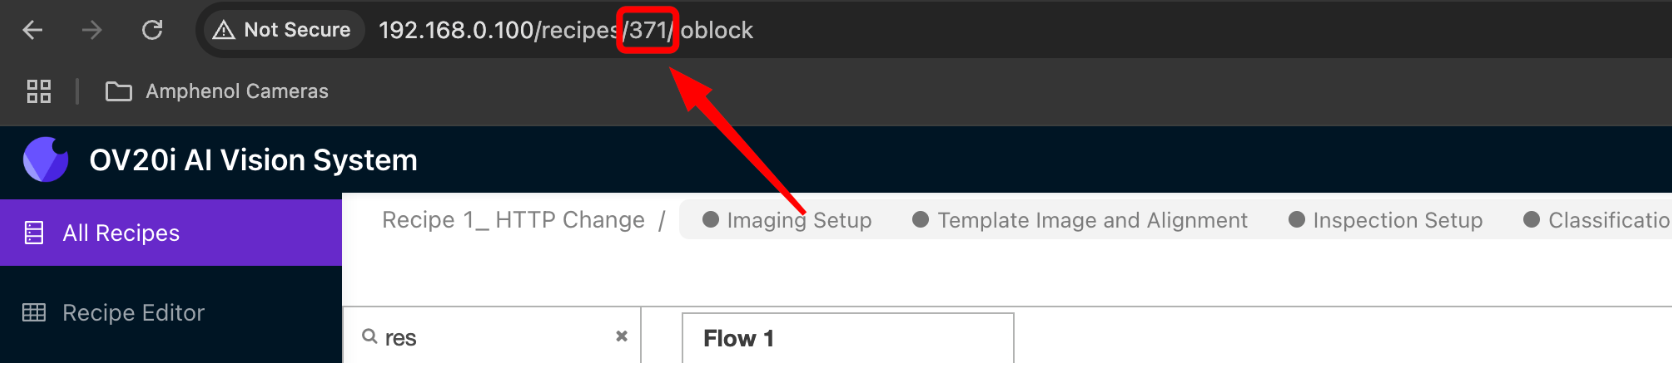
1.2 找到您的 Recipe 编号
- 在 Recipe Editor 中查看浏览器地址栏
- 在
/recipe/之后查找数字(例如:如果 URL 显示/recipe/10,您的配方编号是 10) - 记下这个数字——几分钟后会用到
第 2 步:打开 Flow Builder
2.1 进入 Node-RED
- 在 Recipe Editor 中,点击 "Configure IO" 或在面包屑菜单中选择 "IO Block"
2.2 从头开始
如果画布上有其他节点,也没关系 - 我们将把新的触发流并排添加到它们旁边。
让我们开始!
第 3 步:MQTT 触发的简单秘诀
以下是你需要知道的一切:摄像头需要两条简短消息就能远程拍照。
- 第一条消息: "Hey camera,请为远程命令做好准备"
- 第二条消息: "现在拍照!"
3.1 将以下 5 个节点拖拽到画布上
从左侧面板拖拽到主区域:
- Inject(来自 Input 区段)- 这将是您的“触发按钮”
- Change(来自 Function 区段)- 用于消息 1
- Delay(来自 Function 区段)- 两条消息之间的短暂停顿
- Change(来自 Function 区段)- 用于消息 2
- MQTT Out(来自 Network 区段)- 向摄像头发送消息

第 4 步:配置您的节点
4.1 设置触发按钮
- 双击 Inject 节点
- 将名称改为 “Remote Trigger”
- 点击 “完成”
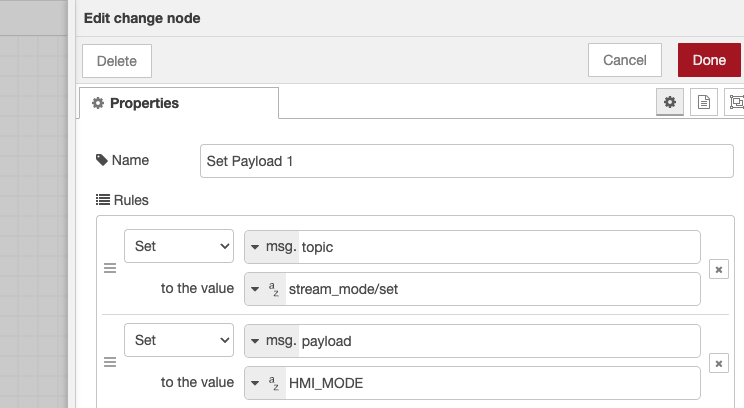
4.2 设置消息 1(Get Ready Command)
- 双击第一 个 Change 节点
- 将名称改为 “Get Ready”
- 点击“添加”并选择“SET”
- 将
msg.topic设置为stream_mode/set - 再次点击“添加”并选择“SET”
- 将
msg.payload设置为HMI_MODE - 点击 “完成”
作用: 让相机“为远程命令做好就绪准备。”
4.3 设置一个小延迟
- 双击 Delay 节点
- 将延迟设置为 10 毫秒
- 点击 “完成”
为什么? 只是给相机一个短暂的准备时间。
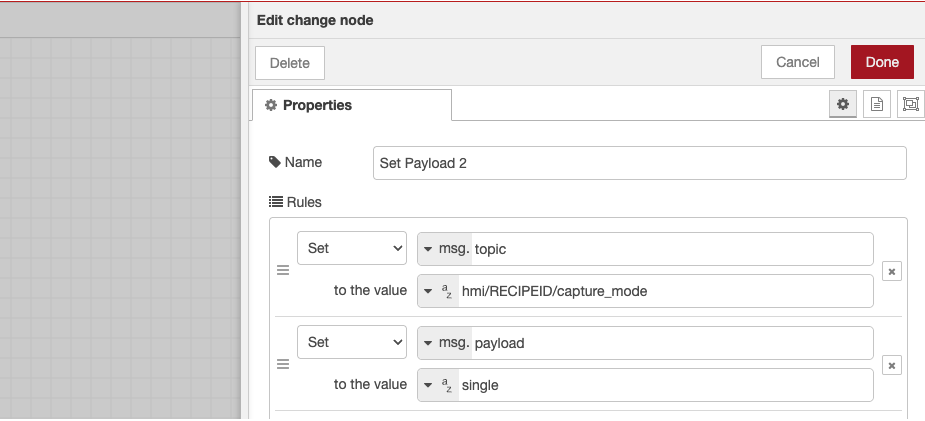
4.4 设置消息 2(Take Picture Command)
- 双击第二个 Change 节点
- 将名称改为 “Take Picture”
- 点击“添加”并选择“SET”
- 将
msg.topic设置为hmi/[YOUR_RECIPE_NUMBER]/capture_mode - 将
[YOUR_RECIPE_NUMBER]替换为您的实际编号(如hmi/10/capture_mode) - 再次点击“添加”并选择“SET”
- 将
msg.payload设置为single - 点击“完成”
作用: 让相机“现在拍摄一张照片!”
4.5 设置消息发送方
- 双击 MQTT Out 节点
- 选择您的 MQTT broker(应已配置好)
- 将名称改为 “Send to Camera”
- 点击 “完成”
第 5 步:将所有内容连接起来
这部分很有趣! 现在将您的节点连接起来以创建流程。
5.1 建立连接
按如下方式在节点之间绘制连线:
- Remote Trigger → Get Ready → Send to Camera
- Remote Trigger → Delay → Take Picture → Send to Camera
可视指南:
Remote Trigger ──→ Get Ready ──→ Send to Camera
      │
      └──→ Delay ──→ Take Picture ──→ Send to Camera
5.2 如何连接节点
- 点击并从节点右侧的小方块拖动
- 将连线放到下一个节点的左侧
- 你将看到一条灰色线将它们连接起来
第 6 步:测试您的远程触发
6.1 启用流程
- 点击右上角的红色 “Deploy” 按钮
- 你应该看到“Successfully deployed”消息
6.2 试用
- 将工件放在相机前进行测试
- 点击“Remote Trigger”节点上的按钮
- 观察相机拍照!
成功标志:
- 相机 LED 短暂闪烁
- 你听到检测处理的声音
- 新图像出现在您的 Library
6.3 检查结果
前往您的 Library 页面 - 您应该看到带有最近时间戳的新图像。点击它以查看检测结果!
如果成功: 恭喜!您刚刚远程触发了相机。
如果没有: 请查看下方的故障排除部分。
第 7 步:从其他设备使用它(可选)
想要从手机、平板或另一台计算机触发吗? 下面是方法:
7.1 来自任意 MQTT App
下载任意 MQTT 应用并连接到相机的 IP 地址,端口为 1883,然后:
- 发送第一条消息:
- 主题:
stream_mode/set - 消息:
HMI_MODE
- 主题:
- 稍等片刻,然后发送第二条消息:
- 主题:
hmi/[YOUR_RECIPE_NUMBER]/capture_mode - 消息:
single
- 主题:
7.2 从命令行
On Windows/Mac/Linux:
# First message
mosquitto_pub -h [CAMERA_IP] -t "stream_mode/set" -m "HMI_MODE"

# Second message (replace 10 with your recipe number)
mosquitto_pub -h [CAMERA_IP] -t "hmi/10/capture_mode" -m "single"
That's it! Your camera will take a picture from anywhere on your network.
Step 8: Validation and Testing
8.1 End-to-End Testing
Complete workflow validation:
| Test | Action | Expected Result | Status |
|---|---|---|---|
| Manual trigger | Click inject button | Image captured and processed | ☐ |
| HMI mode activation | Check camera status | Camera switches to HMI mode | ☐ |
| Inspection execution | Verify processing | Debug shows inspection results | ☐ |
| External trigger | Send MQTT command | Remote triggering works | ☐ |
8.2 Performance Validation
Monitor these metrics:
- Trigger response time: From MQTT message to image capture
- Processing duration: Time to complete inspection
- Result delivery: Debug output timing
- System reliability: Consistent triggering over multiple tests
8.3 Production Readiness
Before deploying to production:
- Test with actual parts and inspection conditions
- Verify integration with your external systems
- Confirm network reliability for MQTT communication
- Document trigger topics and message formats
Step 9: Quick Troubleshooting
Not working? Here are the most common fixes:
9.1 Camera Doesn't Take Pictures
| Problem | Quick Fix |
|---|---|
| Nothing happens when I click trigger | Check that your recipe number is correct in the "Take Picture" node |
| Camera takes picture but no inspection | Make sure your recipe is Active and has a trained model |
| Trigger works sometimes | Verify trigger is set to Manual in Imaging Setup |
9.2 MQTT Issues
| Problem | Quick Fix |
|---|---|
| Red dots on MQTT nodes | Check MQTT broker connection in your setup |
| Deploy button is grayed out | Click anywhere on the canvas first, then try Deploy |
| Nodes won't connect | Make sure you're dragging from the little square on the right side |
Still stuck? Double-check that MQTT communication is set up correctly (see the MQTT Communication Setup guide).
You Did It! 🎉
Congratulations! You now have remote control of your OV20i camera. With just a few clicks, you built a system that can:
- Trigger inspections from anywhere on your network
- Work with phones, tablets, computers - anything that can send MQTT messages
- Integrate with other systems like PLCs, sensors, or custom applications
- Scale to multiple cameras by using different recipe numbers
What's Next?
Now that you have the basics working, you can:
Easy Next Steps
- Test from different devices using MQTT apps
- Create multiple triggers for different recipes
- Add this to your production workflow
高级想法
- 连接到 PLCs,用于自动化生产线
- 构建自定义应用,以触发多台摄像头
- 添加结果转发,将检查数据发送到其他位置
- 创建操作员仪表板,带触发按钮
实际示例
以下是他人使用 MQTT 触发的方式:
- 质控站(Quality Control Stations):操作员扫描条码,系统触发摄像头检测
- 传送线(Conveyor Lines):传感器检测到零件,自动触发检测
- 人工检验(Manual Inspection):带有简单“Inspect”按钮的平板供操作员使用
- 生产监控(Production Monitoring):中央系统协调多台摄像头
可能性是无限的——这一切都始于你刚刚搭建的那个简单系统!